Using CloudTables in a .NET project
This blog is a transcription of the Embedding - .NET video. We hope that this written version will help our non-English speaking users follow along and also those of you who prefer written instructions!
For reference, this is the original video:
Introduction
In this blog post I'll demonstrate how quick and easy it is to embed a CloudTable into your .NET application.
With .NET, there are several core UIs. There's Razor, MVC and Blazor. Today we'll be demonstrating Razor as that's the simplest one to get going.
Getting started
To start, we need to create the web app. For this, I'm using VS Code, and typing the commands into the build-in terminal.
dotnet new webapp -o cloudtables
Then restart Code to use the app that we just created:
code -r cloudtables
Because we're going to use the CloudTables API to embed the table, we need include the CloudTables API package:
dotnet add package CloudTables.Api
Now we'll fire up the app:
dotnet watch run --urls=https://localhost:5001
If you now load https://localhost:5001 into your web browser, you'll see the .NET default page.
API Keys
We'll demonstrate how we'll be using tokens to give extra security. They stop people from sniffing and accessing the page, as the token is tied to a single session.
You can run serverless, which may be fine if you have a small company and it's on an Intranet. You wouldn't want that on the Intranet, since anyone can access the page, your data will openly available and can be mangled by anyone.
On the CloudTables site, go to your application's Security settings, and you'll see the API keys that you're given automatically.

You get one for read-write, and one for read-only. You can create more to give finer granularity to the security, but for most cases those two are fine.
We're going to embed the standard data set that we use for these demonstrations. Go to your data set, and to the Embed tab. You'll see the Serverless tab that I mentioned, but for this demonstration we'll be using ".NET (Razor)".
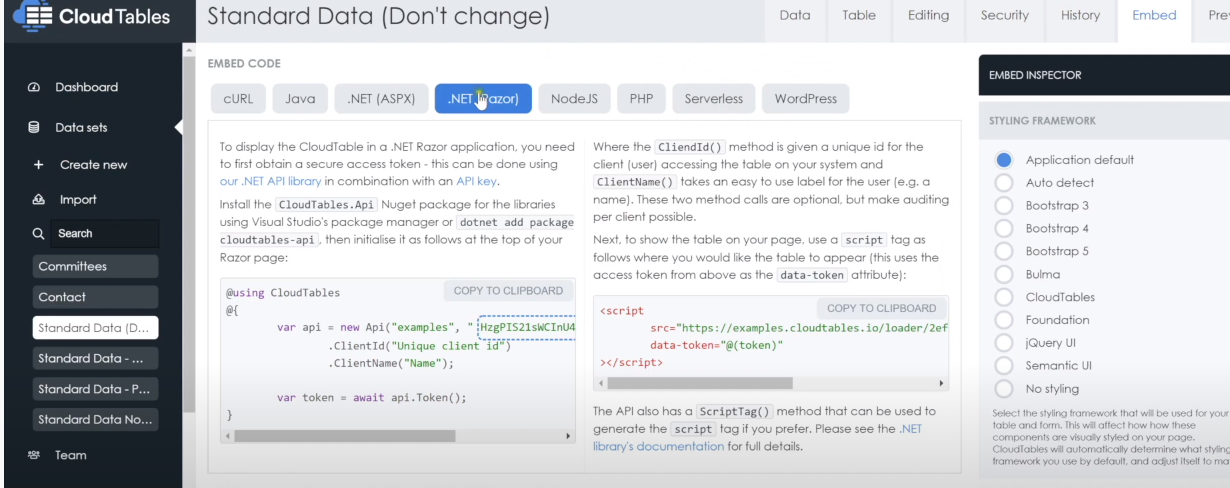
First of all, we'll need to create the API handle and then call that to get the token. Press the "Copy to clipboard" to grab this text:
@using CloudTables
@{
	var api = new Api("examples", "HzgPIS21sWCInU4nytpCDpYr")
		.ClientId("Unique client id")
		.ClientName("Name");

	var token = await api.Token();
}
You can decide whether you want the read-write API key or read-only in the drop-down - the default is read-write.
Adding API Code into .NET
We'll go back to VS code, to the page we just created, index.cshtml. We can replace the "Hello" text you're given default with a <h1> header for CloudTables, and then paste in the code we just copied from the CloudTables page:
@page
@model IndexModel
@{
    ViewData["Title"] = "Home page";
}

<h1>CloudTables<h1>

@using CloudTables
@{
	var api = new Api("examples", "HzgPIS21sWCInU4nytpCDqYr")
		.ClientId("Unique client id")
		.ClientName("Name");

	var token = await api.Token();
}
This will now give us the token, that we will then use to create the script tag.
Go back to the CloudTables page, and "Copy to clipboard" the script tag on the ".NET (Razor)" page, and paste that into our .NET page, giving:
@page
@model IndexModel
@{
    ViewData["Title"] = "Home page";
}

<h1>CloudTables<h1>

@using CloudTables
@{
	var api = new Api("examples", "HzgPIS21sWCInU4nytpCDqYr")
		.ClientId("Unique client id")
		.ClientName("Name");

	var token = await api.Token();

	<script
		src="https://examples.cloudtables.io/loader/2efd2e3c-4e00-11ec-a93d-b34dbb1f0acd/table/d"
		data-token="@(token)"
	></script>
}
In your application, you'll proabably have a sign in page already, which would then tie into the "ClientID" and "ClientName" fields, and that would determine which level of security that user would have (RW or RO). For the purpose of this demo, we'll just use the same token and attributes for all users.
We'll now save our application, and as we put a watch on the run command, it'll rebuild the project for us.
Return to your web page, refresh, and you'll now see your CloudTable on https://localhost:5001.
Azure
With the code as it stands, you can deploy this to Azure by selecting "Azure App Service: Deploy to Web App...". If Azure is correctly configured, the page will be accessible by anyone on the Internet.
Summary
As you've seen, it's very easy to create and embed a CloudTable. I hope this has been useful - don't hesitate to get in touch if you have any questions or comments!
© 2022 CloudTables designed and created by SpryMedia Ltd.
SpryMedia Ltd is registered in Scotland, company no. SC456502.
Terms of Service | Privacy Policy.